Hope to see you again :

Sunday, August 14, 2022

Minimalist Bar with decoupage bottle and a aroma candle (Personalised Gift Ideas )

The project 


Hello to all of you. 
I am here with my latest work. This was a personalised gift for a house warming event. This bar was ordered online but the client wanted more personalised look and something to go with it. So I decided to make a decoupage bottle with Marilyn Monroe ( old beauty) along with an aroma candle. 
It was a complete decor any Morden bar would have. A very minimalist approach. Keep it anywhere in the house and it will look beautiful 😍. You can also put a real or a artificial plant in the bottle if you wish to add to its beauty. 


The Aroma candle 

The Candle : Now the big thing was to decide on which fragrance to choose from? 😁😁 After much discussion We finally ended up choosing WILD FOREST. This aroma is oil based and was soothing as well. So I finally took a heat resistant jar, since it looked plain, I did some out line with black liner and coloured it with glass colours by Fevicryl. 

Then I heated soy wax, added aroma, and poured it in the jar so that it sets. After 48 hours it was ready and smelled amazing 🤩 .


The full view of the Bar, the bottle and the aroma candle.


Decoupage bottle

The Bottle : Then I took a nice bottle and prepared it by cleaning and removing the stickers and paint from the surface . Once that was done I applied a coat of Gesso and let it dry completely. Then I took the printed decoupage paper and removed extra layers of tissue till I was left with the printed paper only. With the help of modpodge I pasted the image and then applied some modpodge on top of the picture covering the entire surface with the glue so that the Image sticks properly. Let it dry completely and then finished by decorating the bottle with jute thread and wooden beads. And yes I did apply a coat of varnish before I decorated the bottle. 


The bar with calligraphy 

The Bar : After cleaning the surface with a damp wipe let it dry and then I used white pen to write the quote. Once it dried, I sprayed it with varnish and it was finally done. 

Do feel free to comment 

Contact me for more details 

🌷🌷 S O C IA L  &   L I N K S 🌷🌷


🧁 INSTAGEAM : @artbug_india 

                                  https://www.instagram.com/artbug_india/?hl=en


🧁 FACEBOOK : https://www.facebook.com/artbugindia.shoma

                               https://www.facebook.com/shoma.beramji


🧁 STORE : www.artbugindia.in 

🧁 YOUTUBE CHANNEL :   https://youtube.com/channel/UCxAAWc_YMwZntewN-G-cYCg
Thursday, December 30, 2021

DESTASH Craft tools, materials, dies, punches, colours, brushes, paper trimmer and more


. ' '.


ARTBUGINDIA Destash


Hello friends,

I welcome you to my Craft Material Destash like tools, colours, acrylic stamps, paper punches, brushes, paper trimmer and lots of other craft related stuff.

 I as a crafter love my collection of tools but at the same time I am trying to adopt a more minimalist approach in my life, hence I wish to sell my “not so used collection” of tools etc.

You can easily access my stuff, On my Facebook page where all the items are listed and priced according to there use again. 

I would also like you to share this page with other crafter friends who may also be interested in buying them. 

My Facebook page link ARTBUGINDIA DESTASH


I will be adding more items soon and the shipping will resume from the 

7th January 2022


Kindly book only and only if you are sure of purchasing..

• Proper tracing details will be provided once shipping is done.

• Combine shipping is also available .


* This Destash is only for India. If you want the items to be shipped outside India then shipping charges will be applicable accordingly.


Sunday, November 14, 2021

Wedding Coconut DIY / decoration ( Shagan coconut DIY )

 Hello friends

First of all thank you all for visiting my blog.

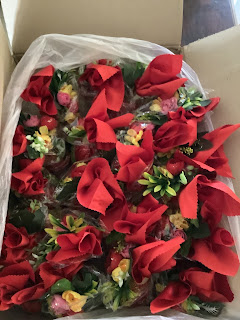
This time I got the opportunity to design these lovely Shagan coconut which is a part of our India wedding. A very simple yet looked very elegantly designed.

I have used satin fabric as the base with good quality ready plastic flowers. The flowers were arranged in a way to look like a small bunch, giving an illusion of a bouquet. Sharing some of the images. Hope you like.


Individual setup looks like this.


Finally when it was done, I individually packed them in clear wrap so that  the flowers don’t gather dust or get damaged.


Do visit my site to buy my products 

ARTBUGINDIA

For product update visit my Instagram page

Artbug_india

Mail me at artbugindia@gmail.com


Thursday, December 10, 2020

All you need to know about Quilting Art : My experience and learning

Hi friends,
I know I have been very irregular with my blog updates. And I have a good reason for it. I have a new love in my life and that's Quilting. I know it's not something relevant to what I have been doing for so many years, but it's only till the time you don't know what you are missing out on. 
It took am a while to know and I really want to let the Indian quilters come out and promote this lovely art.
 I had a very small 
  • Budget
  • Material
  • Space
  • Most importantly knowledge at that point.
I learned a lot and like all other art forms its a lifetime effort to master this art too..

sharing some of my work as an amateur..
I loved making these quilts for my loved ones..


Add caption


In the end I will only say ..keep Learning and exploring yourself and your hidden talents.
**if you have any questions, please feel free to comment.

Wednesday, July 11, 2018

Paper Quilling Clown / Joker

Hello firends, 
My latest project, a paper quilled Joker/ clown, where I spend about 18-20 hours. In the beginning I had only planned to make a Joker, but once it was made , I decided to make the composition with all the stuff around it. The maximum time went in making the box, (about 4 hours) where I wanted to give a cane look and had to do weaving of 3mm strips. In the end I made a cylinder out of 2 (A4) size acitate sheets to cover the whole project

Hope you enjoy it. Feel free to leave your comments and suggestions..


YouTube video 

Things used in making this Quilled Joker composition
* I have used 3 mm and 6 mm strips to make the project. 
*Quilling strips 3mm & 6mm and some of the tools : Itsybitsy
*Ek punch for the banner : Crafters corner 
*Wooden base : A1 craft store
*Quilling pen : Quilled creation

Monday, February 5, 2018

Embellishments by Altered Craft

Hello Friends,
Welcome to my blog, today I am going to share my views on these lovely embellishments sent to me by Altered Craft.  I have been crafting from 8 years and have used so many different kind of embellishments to make the projects look attractive. Some good, some not so good. Having right material for the right job is the key that leads you to a successful layout.

The Altered Craft embellishments are good quality and the finish is very nice, and after trying out different color mediums, I realized that almost all Acrylic,  Permanent Inks and Alcohol colors go very well with these.. some of the experiments I am finally sharing with you all… hoping you will like it..

Do leave your views and comments 
All the supplies are listed below..


A Stone Paper weight

Project 1:
I colored the stone with layers of Ranger Alcohol inks, (I used, Caramel, Latte and Ginger) once I got the right color, I moved to coloring the the Embellishment, I used the alcohol blending solution so that the base can be made little lighter. And finally ended up getting the desired finish. In the end I add some micro beads and stickles to finish it up..Giving it a rustic look in the end..
Paper Weight

Picture Frame
Project 2:
I used Stickles to color the frame and giving it a softer look..Finishing it up with my baby's pic..


Locket
Project 3:
Here I used Copic Colors to make the flowers and leaf. Since Copic colors are alcohol based it nicely covered the surface and where i needed lighter tone I just washed it off with alcohol solution. In the end added the chain .. and here I have a lovely Valentine's Day gift ready..
Pendent
Project 4:
In this I made a 'For You' card. I simply useda little shimmer on top of it, sadly the picture is not clear but the shine is very nice and soft..


'For You' Card 
Project 5:
In this project I made WISH BOTTLES .. and I used Inktense color pencils to color the embellishments..a soft red color adds on to the beauty..

WISH BOTTLES

This is finally how it looks...
Altered Craft : 
They are Pune based company and comes out with lovely collection of embellishments every month so do look out for more lovely designs for your projects. They also take bulk orders..do share your experience of this product , in the comment below.. 

SUPPLIES USED:

- EMBELLISHMENTS : ALTERED CRAFT
- COPIC COLORS : HAKIMI STATIONERIES
Inktense Color Pencils : Amazon India
- Stickles : The Craft Shop
Ranger Alcohol inks : CraftersCorner
- Micro Beads : A1 Craft Store
- Wish Bottles : Rainbow Craftykari
shimmer : Rainbow Craftykari


Thursday, January 18, 2018

Tonic Glass Mat its uses and Review


Hello Friends,
First of all pardon me if I went wrong somewhere in my Videos, being my first voice video and I am yet learning on how to make them, any feedbacks on improving my video is highly appreciated.
Today’s blog is on Glass Mat by Tonic. I was very impressed when I first saw Vicky using the bigger Glass Mat by Tonic. Immediately I was impressed by the looks of it. It comes in 2 sizes. The one which I got is a 12x12 in mat and very convenient, surely fits my table which is not very big in size.

It came well packed from A1 Craft Store, thanks Neha for getting it for me. I got it few days back and was busy trying different craft products I could use on this mat. Till now I have used these things that you see in the Picture, apart from Fevicol , Deco Glue and mixing color of different kind. Just love it. And soon I will share my completed projects, since its something I am using it regularly, now.

Tonic Glass Mat
What all you can Do on the Mat
  • you can cut with your pen knife on the mat but avoid the intricate cuts or heard cuts, you will spoil the blade faster.
  • you can use any kind of mixed media colors and paints , since the cleaning is very easy.
  • You can use distress inks, Oxide inks, Distress Paints, Alchol Inks, and the list goes on
  • I used little soap water to wipe my surface clean.
  • You can use this surface to heat emboss on your projects, its a tampered Glass and can take the heat, but to be on the safer side i kept the heat gun at a safe distance.
  • Any kind of marker pen can be used on it and can be cleaned off easily.
  • All the stenciling and mixed media effects can be done easily.
  • Use you glue gun directly and make designs without any worries.

  • The possibilities are endless...........
I think this is a good investment for a crafter and a must have for artists. You will see me use it more often. In the end I want to thank you for visiting my blog watching the videos, do comment and like it. If there are any questions feel free to leave a comment and I will get back to you.
Enjoy 

YouTube Links to the Videos

Tonic Glass Cutting Mat : Uses and Reviews Part 1

Tonic Glass Cutting Mat : Uses and Reviews Part 2


These are the main supplies used.

Tonic Glass Mat
Zig Water Color Pens
Distress Oxide Inks


Saturday, July 29, 2017

My small Kitchen Garden

Hi Friends,
Welcome to my kitchen Garden. For a long time I have been thinking of starting my own Organic Kitchen Garden and now finally after 45 days my seedlings look like this.


Thats the Methi plant growing up..
Thats the Methi, tomato, mint, basil and lemon plant growing up..
After 4 months you will have a garden like this 


Thats the Mint plant growing up..


Growing your own garden is not too tough, just a little caring and loads of planning and disciplining yourself goes in..I will also link too the sites i normally pick up my garden supplies from:

UGAOO is an online store and are very helpful for seeds and other tools.


Mint Plants

TOMATO

GREEN CHILLI

BASIL

GREEN CHILLIES